Tag: Microsoft Office

A very common scenario in Excel is creating spreadsheets that report numbers for specific time periods. For example, weekly, monthly, quarterly, or annual reports.  This means you will continually be re-creating the same spreadsheet going forward in time – other than the variance in reported data.

You don’t want to start from scratch. Make quick work of your next report – duplicate the sheet, then edit the details. 

Some of you might be asking “Does she mean copy-and-paste?”  NO!  Though it can be accomplished by copying the info from the previous spreadsheet to a new blank sheet, it will take more work than the duplication method because there are several things that do not come over with the copy-and-paste, including:

  • Widened columns.
  • Changed row heights.
  • Print settings, including headers and footers.

To duplicate a sheet:

  1. Drag the sheet tab to the right while holding the CTRL key down.
  2. When you see a little black triangle appearing on the right side of the sheet tab, release your mouse before releasing the CTRL key.  The new worksheet will be named the same with a (2) after it. Example: A duplicated March sheet will be March (2). 
  3. Now edit the details of the duplicate sheet.  Change the sheet name, edit time period labels, input your new data.

Quick and easy you are done with your report and leaving your office early! (Until the boss decides they need to give you more work 🙂

Tags: , ,

Do you get tired of re-typing the same paragraphs or specially formatted text in your documents on a regular basis?  Or maybe you have tried to solve that issue by opening previous documents to copy and paste text to your new document.  No need to do that when you can “memorize” text passages with Word 2007/2010 Quick Parts. 

Quick Parts allows you to create reusable formatted text, even tables, which you can insert instantly without recreating every time you need it. 

A good example is the closing paragraph and signature in a letter. If your letter closing and signature is always the same, don’t re-type it or copy-and-paste it each time. Create and use it as a Quick Part!

Here is how you create your custom Quick Part.  In this example I will do a closing paragraph and signature area.  You only have to do this once, unless it changes.

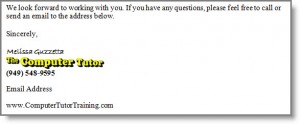
  1. Create the text in a Word document as you want it to appear in your documents. (Or you can open one that already exists). In the following example of a letter closing I have even used a picture logo.Microsoft Word Quick Parts Example
  2. 2. Select the full passage you want included. In my example above, I will select from “We look forward… down to (and including) my website address.

3.  Insert > Quick Parts > Save Selection to Quick Part Gallery.

4.  Word will suggest a name for the Quick Part, but you can edit the name.

5.  Word will save it in the General category of Quick Parts. However, you can create a new category of Quick Parts by clicking on Create New Category from the drop-down. Category examples:  LetterClose, or Disclaimers

To use your Quick Part in future documents: 

  1. Click at the spot where you want to insert the text.
  2. Insert Ribbon > Quick Parts > select your Quick Part from the list.

You should now see your entire closing and signature line! Every time you need to use the text – that’s all you have to do.  Saves a lot of typing! 

Another component of Quick Parts is the Building Blocks Organizer (I’ll call it the BBO).  The BBO includes a list of built-in “document parts” you can use for instantly professional looking documents.  Examples of document parts include cover pages, headers/footers, tables, text boxes, and more.  A great way to check out how you might use the BBO is to explore it, try some out.  Insert > Quick Parts > Building Blocks Organizer…

There are so many cool features to help make your work fast and easy in Microsoft Word. Stay tuned for more time-saver tips!

Like knowing the shortcuts?  Our Microsoft Word Shortcuts “Cheat Sheet” is now available. Click here  for more information.

Getting good training is the single most important thing you can do increase your computer productivity.  That’s where we can help!  Sign up for our email list on our home page and give us a call today.

Tags: , , , , , , , ,

Where should you start when you want to learn Microsoft Office?

As I mentioned in an earlier post to beginners, having clear goals is the best place to start. You should also make sure you have basic Windows skills, which includes knowing how to navigate your computer, adjust settings and preferences, get to the internet, create folders, open programs, and manipulate windows.

 Microsoft Office includes a group of programs for tasking. The core programs include:

Word – Word processing, for creating letters, memos, reports, and book writing.
Excel – For creating spreadsheets, tracking data, mailing lists and other simple data lists, and graphs.
PowerPoint-For creating and displaying presentations, flyers, and handouts. You can also create computer photo albums.
Outlook-For email, calendar, contacts, and task lists.

Other programs may be included, depending on which version of Microsoft Office you have.

In general, the best place to start is with Microsoft Word, since so much of what you learn will carry over to all other programs, as well as on the internet. Many of the tips and tricks you learn in Micosoft Word will also help improve your productivity (make you speedy) and keyboarding.

From there, evaluate what you need. For example, if you are job hunting, watch for what the job posts are asking for.  Outlook is often a good next step, since Outlook is the #1 email and schedule program used by businesses.

Excel is a versatile and popular program, and many jobs require at least a basic knowledge of Excel.  PowerPoint may not be required in many jobs, but it’s one of the easier and fun programs to learn.  In an upcoming post I’ll describe and compare learning Word versus learning PowerPoint.  Stay tuned!

Tags: ,
Back to top